You are here: Books --> Effective Onscreen Editing 4th edition --> Word 2016 Chapter 10: Automating Your Edits
Vous êtes ici : Livres --> Effective Onscreen Editing 4th edition --> Word 2016 Chapter 10: Automating Your Edits
Chapter 10: Automating Your Edits
“I have always wished that my computer would be as easy to use as my telephone. My wish has come true. I no longer know how to use my telephone.”—Bjarne Stroustrup (originator of the C++ programming language)
“The probability that a given program will conform to expectations is inversely proportional to the programmer’s confidence in his ability to do the job. When a programmer tells you ‘no problem’, you have a serious problem. No system is ever completely debugged. Attempts to debug it invariably introduce new bugs which are even harder to find.”—Brasington’s laws of programming
Software and reference links for all versions of Word
This Web page contains instructions on the following subjects:
Automatic text
Macro for cleanup of a document
Macro for changing author name for a blind review
Macro for copying selected text into the Find dialog box
Print a list of your automatic text entries
Recording a macro
Running a macro
Templates and Add-ins dialog box
Automatic text
Word offers several "automatic text" features that will do large amounts of typing for you.
First, let's consider the "AutoCorrect" options. To access them, open the "File" menu and select "Options". In the "Word Options" dialog box, select the "Proofing" tab and click the "AutoCorrect Options" button:
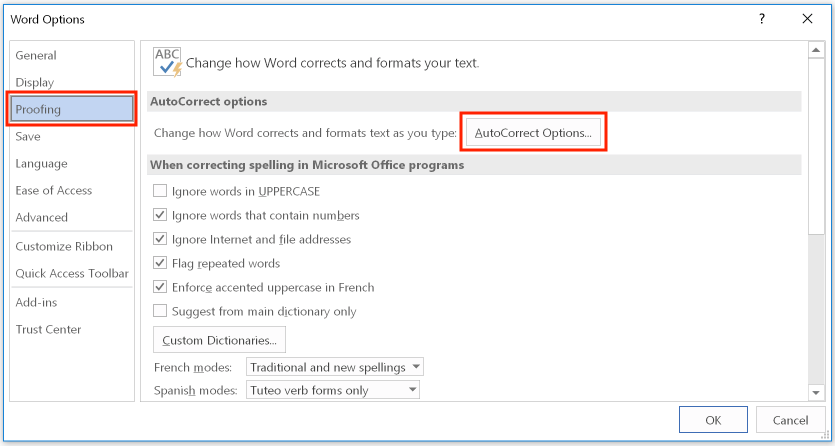
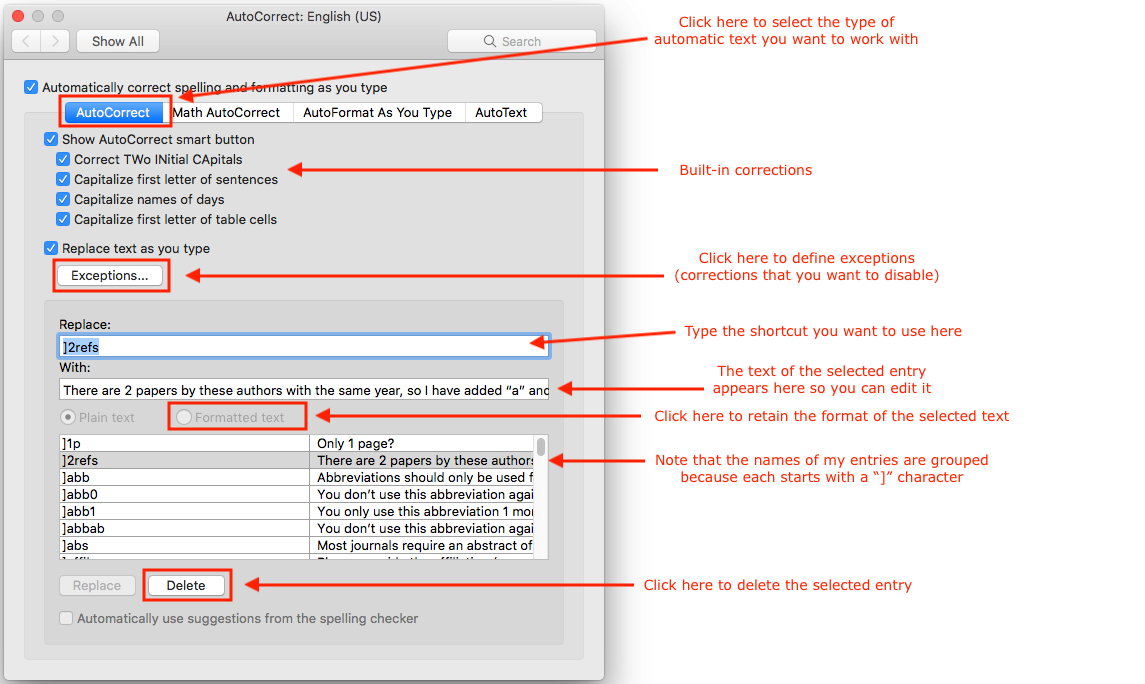
In the "AutoCorrect" dialog box, you can manage your "AutoCorrect" entries, as well as the "AutoFormat" and "AutoFormat As You Type" options. Here, let's focus on "AutoCorrect":
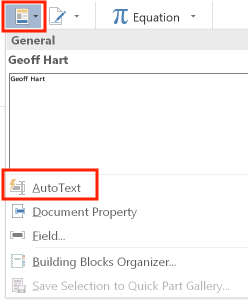
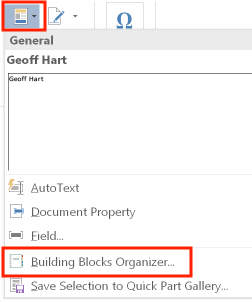
The longer automatic text entries that were called "AutoText" in older versions retain that name, but they're now hidden among the so-called "building blocks". To access these tools, select the Ribbon's "Insert" tab, and at the far right end of the Ribbon, open the menu under "Quick Parts", and select either "AutoText" or the "Building Blocks Organizer":
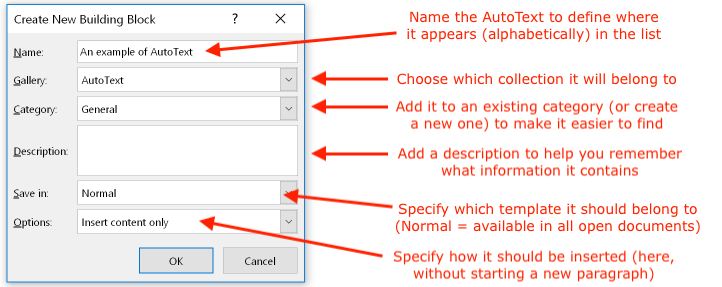
Note that if you want to create a new AutoText entry, you should first select the text you will use in a document, then select "Autotext" from this menu, followed by "Save Selection to AutoText Gallery". Once you have at least one AutoText entry saved, the AutoText menu item opens a dialog box that shows the available entries, with the "Save Selection to AutoText Gallery" option at the bottom of that list:
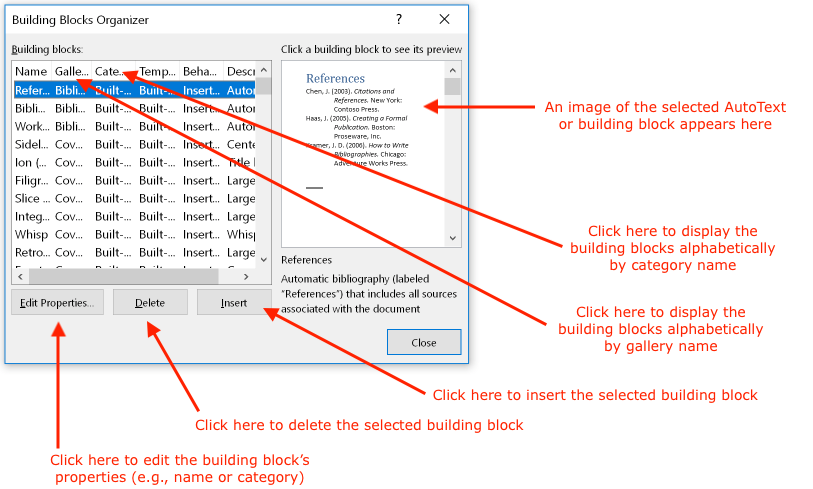
You can also access your AutoCorrect entries using the "Building Blocks Organizer". Select the Ribbon's "Insert" menu, click the "Quick Parts" icon, then select "Building Blocks Organizer":
In the "Building Blocks Organizer" dialog box, you can display your list of automatic text, edit the properties of individual items, and insert the information in a manuscript:
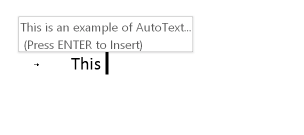
When you start typing text that Word believes is one of its entries, it displays a hint balloon to remind you that if you press Enter or F3, Word will insert the full text at the cursor position:
Macro for cleanup of a document
Sub Cleanup()
' Cleanup Macro
' Recorded 8/7/05 by Geoff '
Selection.Find.ClearFormatting
Selection.Find.Replacement.ClearFormatting
With Selection.Find
.Text = "^p^p"
.Replacement.Text = "^p"
.Forward = True
.Wrap = wdFind Continue
.Format = False
.MatchCase = False
.MatchWholeWord = False
.MatchWildcards = False
.MatchSoundsLike = False
.MatchAllWordForms = False
End With
Selection.Find.Execute Replace:=wdReplaceAll
End Sub
Macro for changing author name for a blind review
To change to a "blind review" identity:
Sub Blind()
Application.UserName = "Journal Reviewer"
Application.UserInitials = "JR"
End Sub
To restore your original identity:
Sub Geoff()
Application.UserName = "Geoff Hart"
Application.UserInitials = "GHT"
End Sub
Macro for copying selected text into the Find dialog box
Sub FindSelectedText()
' FindSelectedText Macro
Selection.Copy
' Define selection as variable
Dim MyFoundText$
MyFoundText$ = Selection
Selection.Find.ClearFormatting
With Selection.Find
.Text = MyFoundText$
.Replacement.Text =""
.Forward = True
.Wrap = wdFindAsk
.Format = False
.MatchCase = False
.MatchWholeWord = False
.MatchWildcards = False
.MatchSoundsLike = False
.MatchAllWordForms = False
End With
Selection.Find.Execute
End Sub
Print a list of your automatic text entries
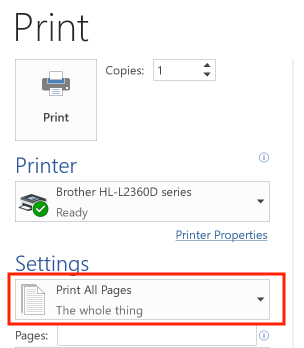
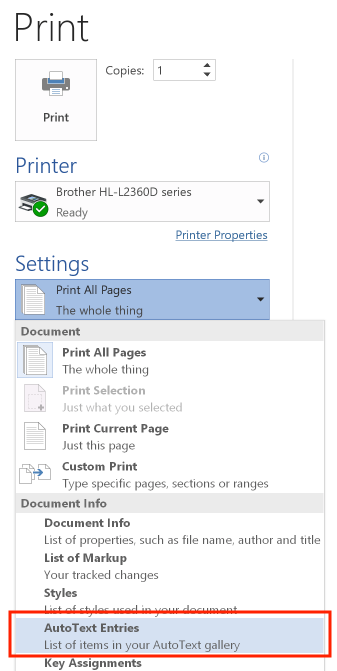
To print a list of your automatic text entries, press Control+P to display the "Print" dialog box. Alternatively, open the "File" menu, and select "Print". Open the menu beside "Print All Pages":
From this menu, you have many options for things you can print. Here, choose choose “AutoText entries”:
Because this list is long, consider producing it as a PDF file. (This also provides a backup copy of your AutoText, since you can copy text out of this file and paste it into a Word document, thereby letting you recreate a missing AutoText entry.)
Recording a macro
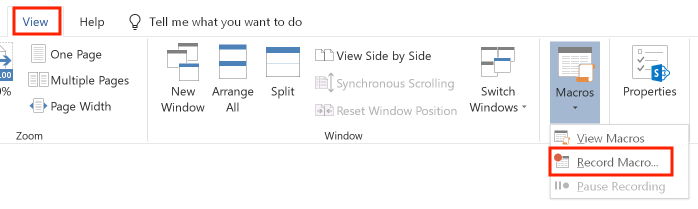
To start recording a macro, select the Ribbon's "View" tab, open the menu under the "Macros" icon, and select "Record Macro":
Name the macro, choose the location where you want to store it, and choose whether to bind the macro to a button in the Quick Access toolbar or to a keyboard shortcut:
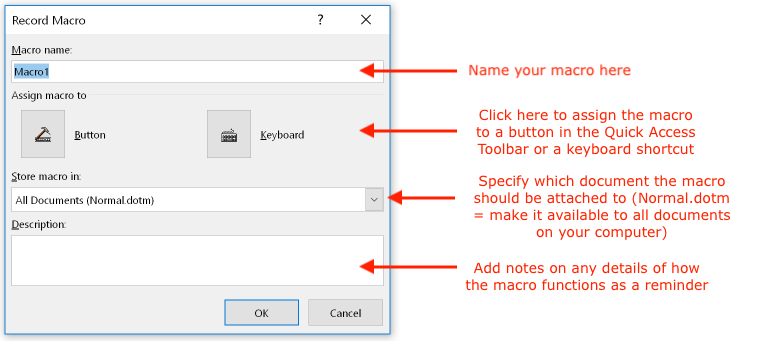
If you click “Button”, you can add the macro as a button in the Quick Access toolbar. If you click “Keyboard” , you can then use the "Customize Keyboard" dialog box (see Chapter 3 for details) to assign a new keyboard shortcut.
While you are recording the macro, the cursor changes to an arrowhead combined with a cassette tape to remind you that you're still recording a macro. In case you're younger than 40 and have never seen a cassette tape or watched Guardians of the Galaxy, here's what the cursor looks like:

Perform the series of commands that you want to record. If you need to pause the recording, select the Ribbon's "View" tab, open the menu below the "Macros" icon, and select "Stop Recording" (if you're completely finished) or "Pause Recording" (if you want to make some minor adjustments to the document before you continue recording the macro):
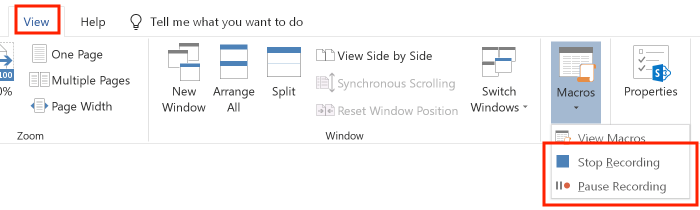
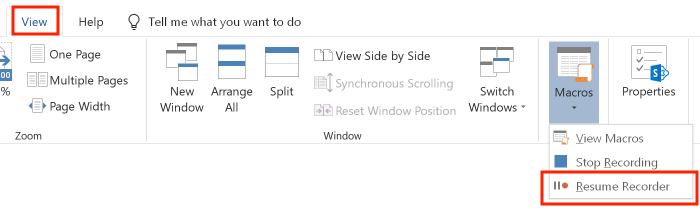
You cannot resume recording if you chose "Stop Recording". However, you can continue recording if you have only paused the recording. To do so, open the menu beside the Macros icon again, and select "Resume Recorder":
Running a macro
There are several ways to run a macro. First, if you stored a macro in the Quick Access toolbar, you can click its icon. Second, if you defined a keyboard shortcut, you can
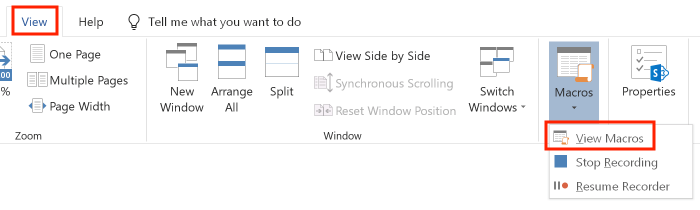
type the keyboard shortcut. Third, you can select it from the list of available macros. Select the Ribbon's "View" tab, open the menu below the "Macros" icon, and then select "View Macros":
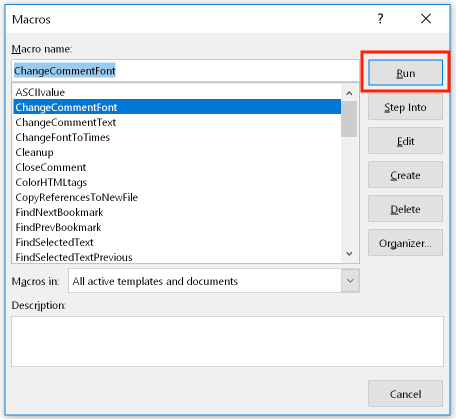
In the "Macros" dialog box, select the desired macro and click the “Run” button:
Templates and Add-ins dialog box
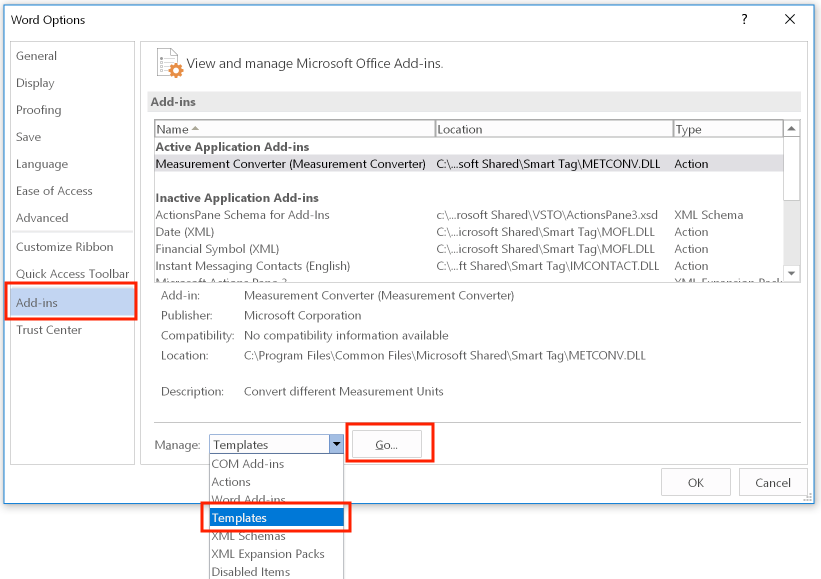
To gain access to the features provided by the "Templates and Add-ins" dialog box, open the "File" menu and selection "Options". In the "Word Options" dialog box, then open the menu beside the heading "Manage" and select "Templates". Click the "Go" button:
Clicking the "Go" button displays the "Templates and Add-ins" dialog box:
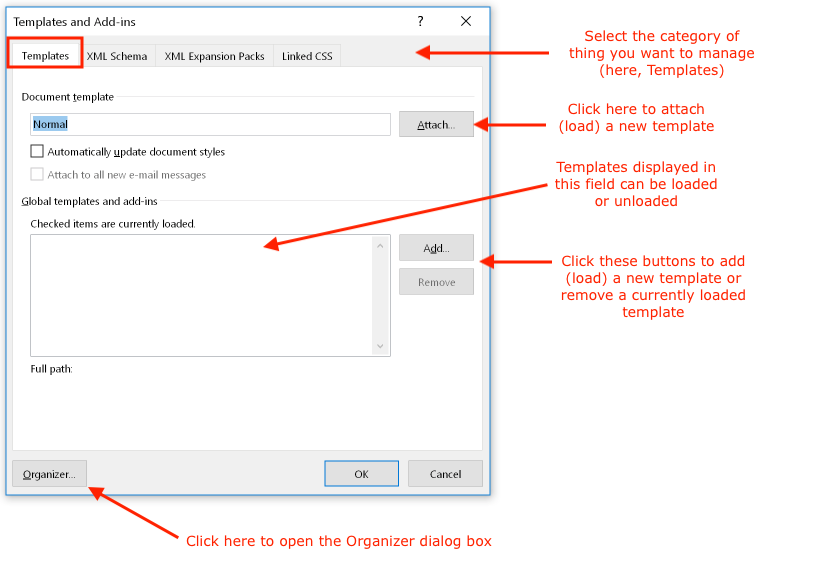
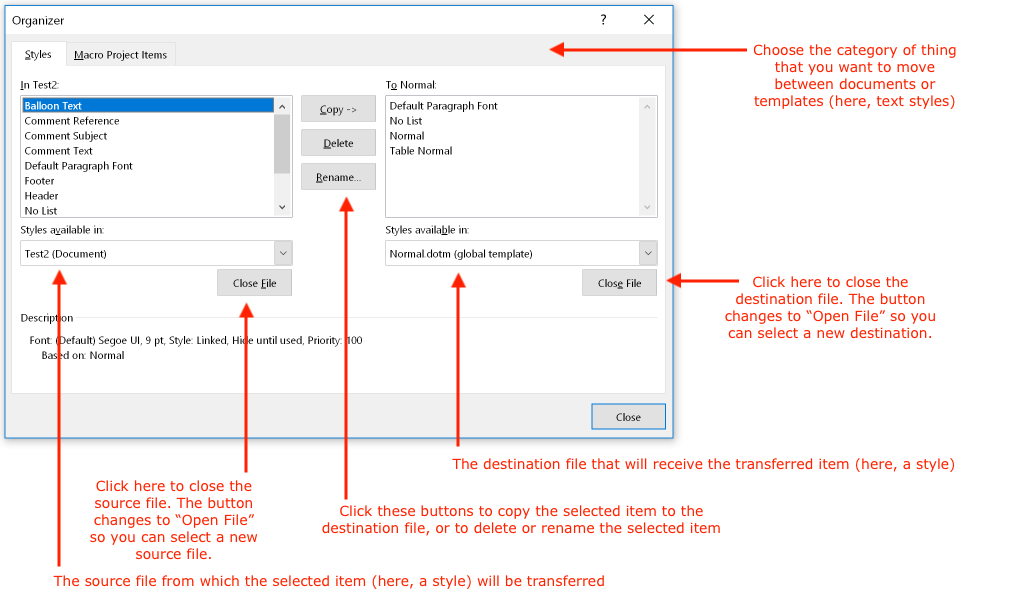
Click the "Organizer" button to gain access to the Organizer, which lets you transfer styles and other things between documents or templates:
©2004–2024 Geoffrey Hart. All rights reserved.